Automated Workflow I
Do you find yourself performing the same mundane tasks over and over? Exporting photos, sorting them, watermarking them, renaming the files, applying metadata, uploading them, etc., etc. These kinds of tasks are simply ripe for automation. Make the computer do all the work, that’s my mantra.
In this series of articles, I will discuss the down and dirty mechanics of how I’ve automated a good deal of my workflow. I’ll probably continue to add chapters to this series as I figure out new methods, but hopefully you can start saving time right off the bat with some of these tips!
Today’s topic is exporting and watermarking.
For starters, I’m using a Mac and I’m using Adobe Lightroom 1.0. If you use different software or a different platform, a lot of this probably won’t work for you. If you manage to port some of my automation processes to a different platform or software package, please share with me!
What we’re going to do together right now is build an AppleScript application that acts as a droplet, which allows you to (as you might expect) drop image files onto it to watermark them. This droplet takes all of the overhead of Photoshop and the monotony of manual labor out of the watermarking process, which I think you will come to love as much as I do.
As a bonus, we can set up Adobe Lightroom to use this droplet as a post-processing filter (and I’ll show you how!), so the activity of applying a custom watermark to your images becomes tightly integrated into the activity of exporting from Lightroom. If you don’t have Lightroom, or don’t even like Lightroom, you can still use the AppleScript droplet to watermark a bunch of photos at once.
The first step is…
Building the Watermark
The first step in automating the watermark process is to have a watermark graphic you want to use. You will need a standalone graphic file that will work in any photo scenario. In other words, if your watermark uses transparency and the text is white, you probably won’t be able to read it if it’s applied to a very light photo.
For my watermark, I have gone with a very small and very controlled
image, which I’ve named simply copyright.gif:

The only technical considerations when composing a watermark image are:
- It should be narrower than the smallest for-web image you will export, so that it isn’t cut off. I always export my images for this blog at 600 pixels wide, so I’m safe with this watermark (which is 310 pixels wide).
- It should be legible on any image, regardless of the image’s lightness or darkness. To solve this problem, I’ve used a black background. I experimented with different approaches and found this one to be the most reliable, even if not always the most attractive.
Now that we have a workable watermark image, it’s time to…
Install ImageMagick
ImageMagick is a command-line image manipulation suite originally developed in the Linux community. It’s free, powerful, and could serve you in more ways than watermarking, so let’s get this thing installed! The easiest way to install ImageMagick is through the package management system called MacPorts (formerly known as DarwinPorts).
Pop over to MacPorts.org/ and download the latest version. You install MacPorts in the same way you’d install any other Mac application: open the .dmg file, run the installer, wait a while, and there you have it. Now that MacPorts is installed, it’s time to delve into darker territories: the terminal. If you are unfamiliar with the terminal, don’t be too intimidated; I’ll show you exactly what to type.
Open up the terminal (the default Terminal application or your choice of replacement terminal.net) and make sure MacPorts is working properly:
airborne@Auriga ~ $ port
Note that your prompt will look different than mine; the only part you
need to type is port. Press return and, if everything has gone
according to plan, you should see the default output of the port
program:
Usage: port [-vdqfonasbcktu] [-D portdir] action [actionflags] [[portname|pseudo-portname|port-url] [@version] [+-variant]... [option=value]...]...
“port help” or “man 1 port” for more information.
Installing ImageMagick should be as simple as:
airborne@Auriga ~ $ sudo port install imagemagick
The sudo command allows you to run a program as the superuser, which
is required in order to install things into locations within the OS X
system folders (much the same as entering your password when running
certain installer packages). You will be prompted for your password;
enter it and press return. It will take some time to download the
required files, decompress them, etc., etc. When it’s done, it will let
you know. If you get any errors along the way, you will want to refer to
the MacPorts website.org or search on the Internet
for solutions; fixing MacPorts problems is too vast an area to cover in
this article.
You can now confirm that ImageMagick is installed by trying to run one
of its included tools, convert. Just type that in and see what
happens:
airborne@Auriga ~ $ convert
A whole bunch of stuff should print out. Don’t worry about reading it.
If you get an error message like -bash: convert: command not found
then try closing and re-opening the terminal. If it doesn’t work after
that, well, something must have gone wrong with the installation and you
should try to figure out what that is. There are a lot of resources
available through the MacPorts.org/ site and
through The Google to help you out.
Now that we have ImageMagic set up, we need to write some…
AppleScript
I love AppleScript. What we’re going to do now is write a small script (or “droplet”) that opens images and places your watermark image on them. Here is the code:
on open theObjects
  repeat with theObject in theObjects
    do shell script "/opt/local/bin/composite -compose Over " & ¬
      "-gravity southwest /Users/airborne/Pictures/copyright.gif '" & ¬
      (POSIX path of theObject as string) & "' '" & (POSIX path of theObject as string) & "'"
  end repeat
end open
Beware. I have broken up a couple of the lines to make it appear properly on the blog. The linebreak character, which should look like the upper right corner of a square, might not appear properly in your browser.
If you want, you can just “download the
script”:/articles/AutomationI/Watermark.app from my site. You should be
able to open this file in Script Editor and change the paths to suit
your environment (mostly change the path to your watermark file), and in
fact, you must change this path or the script will not work. In the
above code, /Users/airborne/Pictures/copyright.gif is the part you
need to change.
I will now explain the code in greater detail for anyone interested. If
you couldn’t care less how it works, skip the next couple of paragraphs.
The first part, on open theObjects means that this script expects to
be opened with files passed into it, either by dragging and dropping
files onto its icon in the Finder, or by being triggered from Lightroom,
et al. (Image Capture can also use post-import scripts and they work in
precisely the same way). When the script runs, theObjects will be a
list of files to do something with.
The following block (repeat with) is then repeated with each file that
was passed in. The composite program included in ImageMagick is used
to layer an image on top of another image, so we call that with the do shell script command, which basically simulates typing something into
the terminal. The -compose Over option tells it to place the second
image on top of the first, and -gravity southwest means to place it in
the lower left corner. I then supply the paths to my copyright.gif and
the POSIX path of each of the files opened by this script (the ones
dropped onto its icon or passed in by Lightroom). If any of this is
unclear, leave a comment.
If you are re-creating this script for yourself, just be sure to save it as an application. In the “save” dialog, you can choose a few different formats to save the script in, but only “application” will give it the ability to operate as a droplet (a program you can drop files onto).
Great, now let’s make it run automatically from Lightroom!
Configuring Lightroom
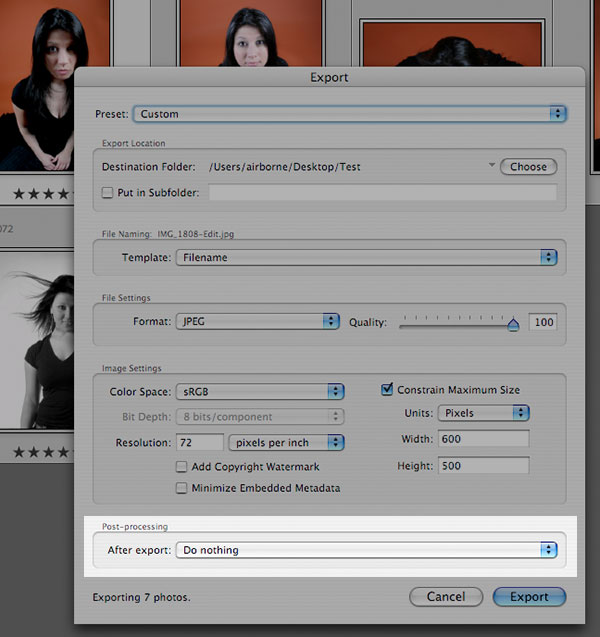
When you run the Export command from Lightroom, you are presented with a dialog box much like the one you see below. We are chiefly concerned with the option highlighted in this picture.
When you open that menu, you will want to choose “Go to Export Actions Folder Now” as shown below.
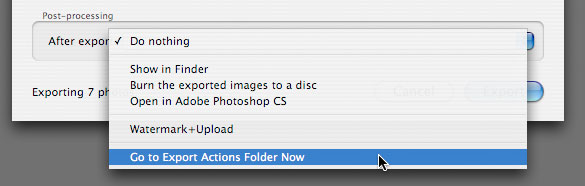
Note: disregard the “Watermark+Upload” option; that is a modified version of this Watermark script that also opens Transmit and uploads the photos to my website. I’ll cover that functionality in another article. See, AppleScript rules!
When you choose that option, the Export Actions folder will be revealed in the Finder and you can then place the Watermark script into it. Make sure it’s in the Export Actions folder and not in the Lightroom folder! If you cancel and re-open the Export dialog, you will now be able to select Watermark in the list. Exporting photos using that post-processing filter should now automatically apply your watermark image!
This has been a long-winded and very technical article. I realize that all of you are coming here with different levels of familiarity with the terminal, ImageMagick, AppleScript, etc., so I covered what I thought were the most important points. If you have any questions, just leave a comment and I’ll be glad to explain anything I left out.
Good luck and happy watermarking!
P.S. Learn even more about scripting in Automated Workflow II.
Comments