ND Filters, Top to Bottom

Have you heard of the fabled “neutral density” filter before? Whether or not you know what one is, I’m about to blow the lid off this mysterious piece of kit, totally demystify the nineteen (well, four…) ways their strengths are measured, and give you some awesome tips for using them effectively in the field.
Starting from the top, what exactly is an ND filter, anyway?
What Exactly Is an ND Filter, Anyway?
ND stands for “neutral density.” “Density” refers to optical density or absorbance. The absorbance of a substance is basically the amount of light it will absorb as opposed to the amount that will pass through it. By “neutral” we mean that the absorbance of the filter is the same across all wavelengths of light.
To put it in simpler terms, ND filters only transmit some fraction of the light that hits them, and when the light comes out the other side the colors should be completely unaffected. Okay, so that’s great, but why do we care?
As you may recall from reading Mastering the Only Five Camera Settings, there is only so much you can do to change the characteristics of the scene you’re capturing.
When I wrote that article, I wasn’t making stuff up; those five settings are really the only ones. By adding an ND filter into the mix, however, you add another variable you can control. We love control, don’t we?
In effect, adding an ND filter is most similar to reducing your ISO sensitivity, which may be the only way to get slower shutter speeds in situations where light is ample and your ISO is already as low as it can go. So then the next question is, why do you want slower shutter speeds?
Why Do You Want Slower Shutter Speeds?
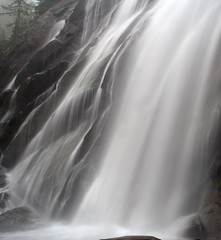
The most often cited reason is to get the “veiling effect” that water produces during a longer exposure. Normally, you might have to go out just after dawn or wait until dusk before the conditions would be right to make a several-second exposure of a natural waterfall.
Check out the awesome photo on the right from skycaptaintwo. Without an ND filter it could be challenging to get the low-light situation that would make that photo possible. Now, I don’t know for sure that this photographer used an ND filter, but the image is a great example of where having one might definitely come in handy.
There are three main reasons for using an ND filter that I know of (but I’m sure you can think of more):
- To get a “veiling effect” when photographing water (this works for waterfalls as well as the water’s moving surface, e.g. the ocean, lakes)
- To capture a sense of movement by adding motion blur (e.g. when people are walking around, cars driving by, and so on)
- To get an increased depth of field (more background blur, or “bokeh”) when light is ample
The first two require slower shutter speeds, the last requires a larger aperture opening. All three necessarily require that more light enter the camera, which is why you may need to use an ND filter to reduce the amount of light that enters in order to keep your exposure correct.
Swell. Now we know all about what ND filters are for. But how do you size them up? ND filter specifications can be pretty confusing. That’s why I will explain ND filter specifications to you now.
ND Filter Specifications, Explained
There are four measures that can be used to describe how much light an ND filter blocks and/or transmits, and they are:
- Attenuation factor (or “filter factor”)
- Optical density (or “grade”)
- F-stop equivalence
- Percent transmittance
Only two of the above are regularly used to describe filters when you’re buying them (grade and density), but it can be helpful to know the others to get a better idea of what it all means. Some sites, like B&H, may also list the remaining stats in the “specifications” tab for each product, though the product title itself will only contain one of the four measurements.
| Filter Factor | Optical Density | F-Stop Equiv. | Transmittance |
|---|---|---|---|
| 2 | 0.3 | 1 | 50% |
| 4 | 0.6 | 2 | 25% |
| 8 | 0.9 | 3 | 12.5% |
| 16 | 1.2 | 4 | 6.25% |
| 32 | 1.5 | 5 | 3.125% |
| 64 | 1.8 | 6 | 1.5625% |
| 1,000 | 3.0 | 10 | 0.1% |
The filter factor or attenuation factor is used often when labeling a filter product. Generally it’s written as “ND8” or “ND64.” The optical density or grade is also commonly used, and will always appear as a decimal number, “0.3” or “3.0” and so on. Just to be completely clear, a filter labeled ND1000 is equivalent to a filter labeled ND 3.0. They are exactly the same.
Now, technically, filters above a 1,000 grade exist. You aren’t going to see them around too often, and I’ll tell you one reason why. With an ND1000, or ND 3.0 filter, you’re blocking out 10 stops of light, which means you’re only receiving 0.1% of the total light in the scene. The ND1000 filter looks like a disk of black glass; you can barely see through it with your naked eyes. When using an ND1000 filter, you have to compose and focus your scene on a tripod and then screw on the filter, because once it’s on you won’t be able to see anything at all, unless you’re pointing directly at the sun… And why would you do that?
Let’s Talk Brands
Filters made by B+W are among the best quality you can buy; the the materials used and the fit and finish are top notch. An ND1000 filter from B+W can run $100 or more.
If you are a Canon “L” or Nikon “Nikkor” shooter, you require a 77mm diameter filter. Here are some nice ones made by B+W from my favorite store, B&H:
- B+W ND 0.3, $49 (same as ND2, 1 f-stop)
- B+W ND 0.6, $49 (same as ND4, 2 f-stops)
- B+W ND 0.9, $94 (same as ND8, 4 f-stops)
- B+W ND 3.0, $97 (same as ND1000, 10 f-stops)
You will find the biggest selection of filters from B+W and Tiffen. Tiffen makes reasonably priced and solidly performing glass filters. You may also want to look at Cokin or Heliopan.
One thing to note when shopping for filters is that a brand like B+W offers each of their ND filters with a variety of options such as a multi-coated surface to reduce flares and ghosting, or in a slim form factor for better performance on wide-angle lenses. Prices vary depending upon the options.
Let’s Talk… Brands… Again
An important thing to think about when you’re looking at adding filters to your kit is the combination of different brands of threaded filters. Although filter threading is standardized, you can sometimes run into trouble when you screw a B+W ND filter onto the front of a Canon UV filter, and so on. Mixing and matching brands is somewhat discouraged.
If you don’t use UV filters (a subject for another post entirely), or if you don’t intend to stack effect filters, then buy whatever brands fit your needs and budget.
Happy filtering!
Comments