Panomania!
Seldom do I employ such emphatic punctuation in a blog title, or such bombastic portmanteaus, but it seemed appropriate given the out-of-control creation of panoramas that I’ve been engaged in lately.
As I mentioned in my last post, I’m out here in the great American west—“big sky country,” if you want to call it that—and some of the sights I’ve seen were nothing less than demanding of a panoramic treatment. On top of that, I suffer from a devastating case of technolust and wanted to really put “AutoPano Giga” through the paces. Well, I sure did. I also probably melted the heat sink off my poor laptop’s CPU…
Arthur C. Clarke once wrote that “any sufficiently advanced technology is indistinguishable from magic.” In the case of AutoPano Giga, I think he was wrong; I think it actually is magic. I have tried a few panorama tools out there; the free and open-source Panotools, a couple of Mac-exclusive ones, and so on. AutoPano Giga is so easy and so fast and so accurate, it blows them all out of the water. Of course it also costs an arm and a leg, but at least you know why.
After the break, actual panoramas!
One of the awesome things about AutoPano Giga is that it reads the EXIF data from your photos to figure out what kind of lens you used, and then adjusts for distortion based on that information. Essentially, this makes it totally kick ass at stitching together fisheye photographs, which normally do not directly overlap whatsoever. The edges have to be flanged out before two fisheye photos taken side-by-side will match up.
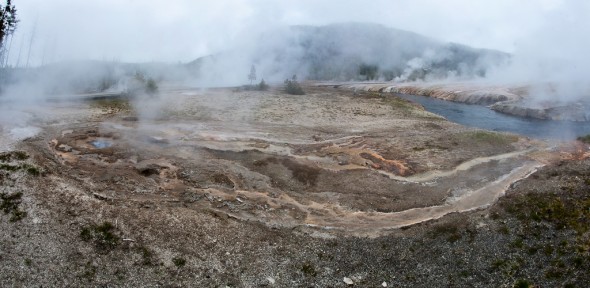
This one, taken at “Black Sand Basin” in Yellowstone, was stitched together from only two 15mm fisheye images (I wanted to limit the number in order to take them rapidly because the steam was moving quickly and when parts of the scene move a lot from one image to the next it can cause ghosting and stitching issues). Click for a larger view.
I think you get more of a sense of the vastness of a space from a good panoramic image. This place is as big as it looks.
While leaving the Grand Teton national Park earlier in the week, we stopped by the site of the “Cunningham Cabin,” which is exactly what it sounds like it is. The cabin itself, though, wasn’t much to look at. I was more intoxicated by the mountain range in the distance and the clarity of the sky and clouds. My New England brain, drunk on what is actually a somewhat average afternoon sky in Wyoming, required the capture of a panorama.
Of course, what you can’t tell by looking at it on this blog is that at actual size, it’s this big:

The total dimensions of this panorama are 11,154 by 3,186 pixels. I could make a very respectable five-foot-wide print of this image with perfect clarity!
Finally, on the last morning in Yellowstone, I wound up on this snow-covered road on the east side of the park and just had to try a crazy panorama. By “crazy” I mean that I didn’t just turn around, taking each photo beside the last. I tossed in a total of 53 images, some pointing up, some down, some tilted to the side a bit… Just to see what AutoPano Giga could do with them.
Click to embiggen!
I did this one on my laptop, so in order to make it possible I exported the original 53 images from Lightroom at about 800 pixels wide. If you look closely on the right side, you can see a little stitching error causing a notch in the far side of the road. I am convinced that this happened because of the limited detail in the smaller input files; when I get home to my big desktop I will attempt it again with 53 full-size 22-megapixel images.
Some of the things about AutoPano Giga that make creating these panoramas easier (or in some cases possible) include:
- The ability to augment the software’s automatic “control point” detection, which is how it links features in one photo to those in another (the core of the “stitching” process); for what it’s worth I’ve almost never had to use it, the SIFT key extraction of APG is extremely good,
- Center point, horizon detection, and vertical correction tools, which allow you to basically coach the software as to what you want the center point to be, or what feature(s) you ultimately want to be horizontal or vertical,
- Numeric yaw, pitch, and roll adjustment, which permits you to tweak the projection of the final image such that the perspective appears the way you want it to,
- Mercator, planar, spherical, and cylindrical projection models, which—although my understanding of projection is limited—essentially gives you a few basic effects to choose from when mapping the images into a flat environment.
With regard to the projection models, cylindrical tends to work best when you have one or more rows of images taken very evenly, whereas spherical and Mercator tend to work better when the images are somewhat more chaotic. I know that’s not an entirely accurate statement, but if you want to know more about projection models… Wikipedia is your friend.
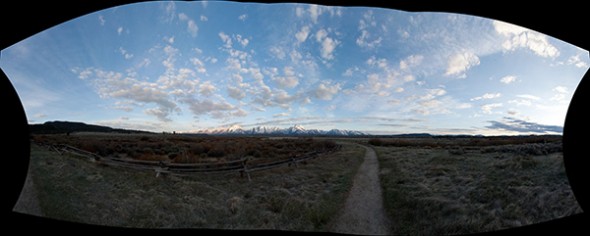
The real challenge of panoramas is that once they’re stitched together, you inevitably wind up with a weird patchwork of images that needs to be cropped down. Here is what the Cunningham Cabin panorama looked like before cropping:

As you can see, you generally want to photograph beyond the edges of what the final panorama will include, because after distorting and stretching the images to fit together, you lose a lot of corners.
One other thing I should mention, although I haven’t yet tried it myself, is that if you bracket ((Bracketing means taking the same photo with different exposure settings, generally something like -1 EV, 0 EV, +1 EV)) each image in your panorama, AutoPano Giga will also “fuse” the exposures, preserving more highlight and shadow detail. Now, you don’t have a ton of control over that process; it’s very hands-off, unlike Photomatix Pro or some of the other actual “HDR” software out there, but it sure makes the whole panorama creation easy!
That’s all I have right now for panomania!, but if you folks have any questions or comments, there are a couple of boxes down there at the bottom that you can use to share them, and I continue to encourage it!
 Single-Serving Photo


Comments